Release Notes April 2024 Version 24.60 – MediSpa Edition
Spring is in the air, and so is our excitement to bring you our latest software update, inspired by your feedback.
Release 24.60 is packed with tons of tweaks and innovations that will simplify your MediSpa practice and elevate your experience with our software. 🚀
One of the major updates includes our revamped Forms feature, which has undergone a few changes to streamline your workflow and boost productivity. Now you can save form drafts, edit responses, customize forms based on feedback, and upload images. In addition, you can restrict form access, embed images directly into forms, and more.
Let’s learn more about all the new updates we have in store for you. So, grab your favorite beverage ☕️ and read about all of the exciting changes to WellnessLiving! 🌟
Here at WellnessLiving, your feedback means the world to us. You’re front and center in our mind with each new release. Be sure to let us know what you think of our release notes by filling out this quick feedback form.
Major Improvements
- Edit scheduled email campaigns
- Save forms as drafts
- Make amendments to form responses
- View amendments to form responses on the Elevate Staff App
- Add images to form templates
- Limit number of responses per form
- Enhanced privacy settings for clients in forms
- New Appointment, Review, and Lead Capture website widgets COMING SOON
- Display events on your clients’ class schedule
- Consistent display of service information for external calendars
- Display service add-ons in appointment notifications
- Sort attendance lists by check-in status
- Automatic asset assignments for partner bookings
- New and improved Welcome email notification
- Updated service age restriction behavior
- Customize the maximum number of days past due for Collections ADD-ON
- More control for staff to stop recurring class bookings
- New location for attendance status for appointments and assets
- Minor Improvements
Edit scheduled email campaigns
Great news! You can now edit scheduled email campaigns. 📅
Jen, the owner of Serenity MediSpa, just finalized her promotional email campaign to announce new treatments on Monday morning. But on Sunday night, she noticed a typo in her email. Instead of redoing the entire campaign, she simply edited the existing email with the correct information. Easy peasy!
Previously, if you scheduled a campaign and made a mistake, you had to delete the campaign. Now, you have the option to edit it as well. No more starting over for a typo! ✏️
To view and edit your scheduled campaigns, head over to the Marketing Campaigns Report > 3 dot action menu > Edit!
Save forms as drafts
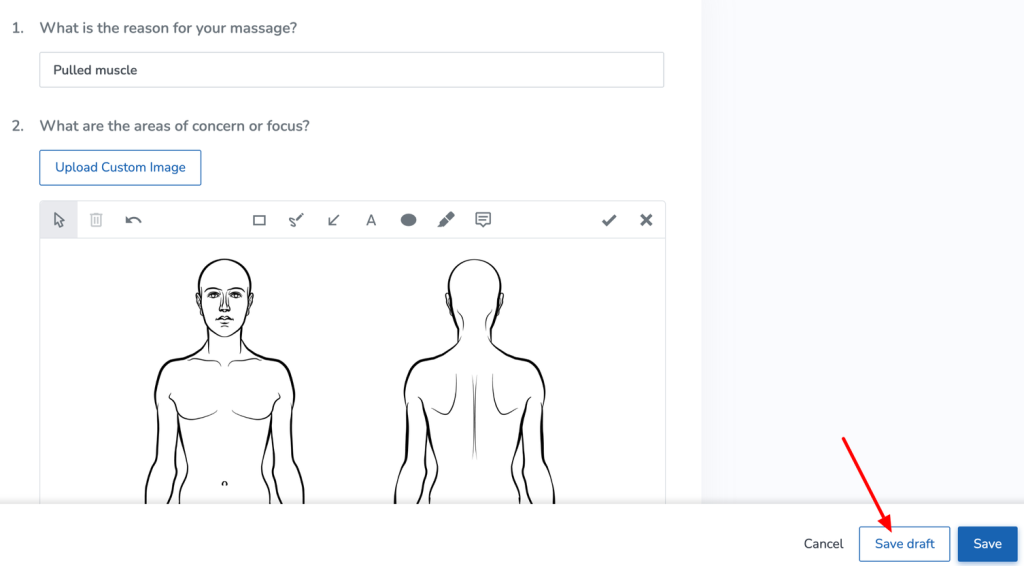

Introducing a much-awaited feature: saving forms as drafts! 📝
Ever found yourself in a consultation with a client at your MediSpa, only to realize the appointment is over and the form hasn’t been completed yet? 🤦♂️ With the form improvement that allows you to save the form as a draft, you can easily finish the form at your convenience, ensuring all details are accurately captured for future treatment.
Previously, once a form was saved, it was locked and marked as complete. If you wanted to make changes, you had to add a new form for the client which wasted time and cluttered up the client’s profile. 📑
But now, by clicking on Save draft, your form stays a work-in-progress! 🚧 You can come back later, armed with all the right details, ready to submit it hassle-free! To make life even easier, there’ll be a friendly orange dot or badge next to the form’s name, clearly showing its status! 🟠
You can save forms as drafts in both the Staff Back Office and the Elevate Staff App.
Learn more about Viewing, adding, and completing a client’s forms!
Make amendments to form responses
Form management just got easier! You now have the ability to amend form responses!
This is fantastic news for Sarah, an aesthetician at Glow & Renew MediSpa. A new client filled out an intake form stating no skincare concerns. Later, she informed Sarah that she’s now avoiding gluten, parabens, and artificial fragrances. Before, Sarah would’ve added a new form to her profile to fill out again. Now she can simply amend the existing form, no duplicates needed!
Just make sure the Allow staff members with permissions to amend this form after completion is toggled ON within the form’s settings and you can make tweaks to forms whenever you need. Every change is logged in the form history and edit log, so compliance is a breeze. 📝
Granting permission for staff members to amend form responses is easy-peasy. Just head to the App Drawer > Setup > Staff > Staff Roles, and look for the new permission: Amend completed form responses. You can decide whether staff can amend form responses only for the clients associated with their services, only the clients who attend their location, or all of your business’s clients.
With these updates, managing forms is smoother and more organized than ever before! 🚀
Want to learn more? Check out Amending a client’s responses to a form.
View amendments to form responses on the Elevate Staff App
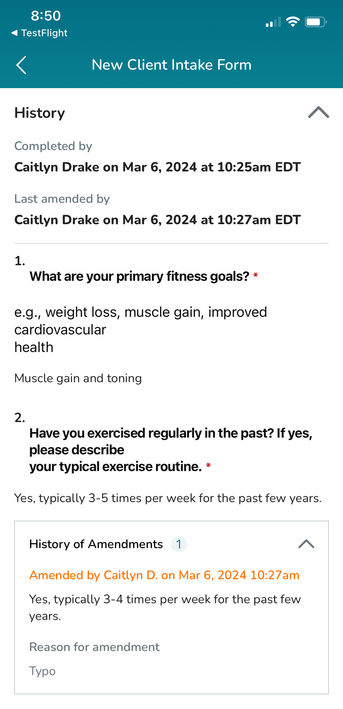
When you’re using the Elevate Staff App, you’ll be able to see responses from clients that were amended by staff members. This handy improvement will allow you to see the original answer, updated answer, and the reason it was amended. ✅
Note: You won’t be able to make amendments to form responses on Elevate.
You’ll also have an even easier time seeing which forms have been completed by your clients at a glance! Incomplete and completed forms are still separated by headers on Elevate, but we added red 🔴 (incomplete) and green 🟢 (completed) dots beside each form for a simpler way to check what your clients still need to fill out.
Add images to form templates
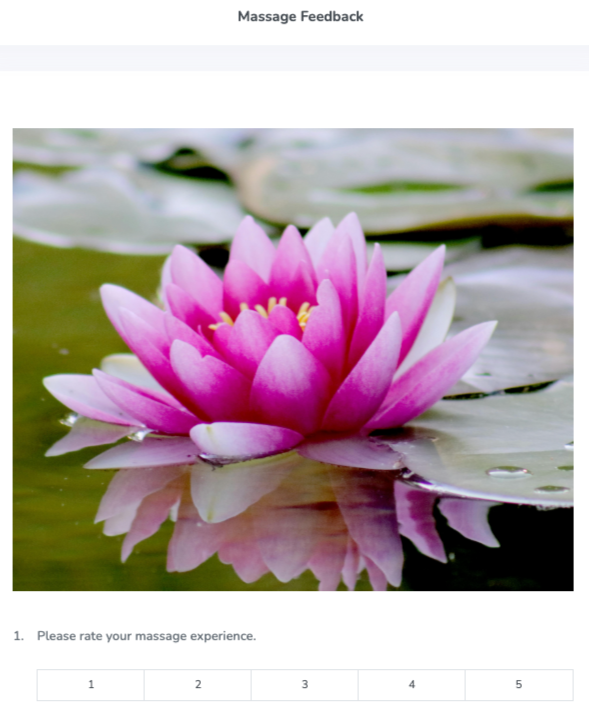
Wish you could add a touch of personalization to your forms? Well, now you can!
Introducing the new Image element which allows you to embed images directly into your forms. 🖼️
Integrating images into your forms can provide clients with more comprehensive information. Lisa, an aesthetician, employs a technique when guiding clients through skincare routines. She includes images of recommended products, application techniques, and before-and-after visuals directly into her skincare regimen forms. 🧴🧼
Say goodbye to bland and hello to visually appealing forms that truly reflect your style and brand. Ready to make your forms pop in the Client Web App, Staff Back Office, Achieve Client App and Elevate Staff App? Let’s get started by heading to the App Drawer > Forms! 🎉
Check out Form components to learn more!
Limit number of responses per form
We’ve revamped the settings for Forms with you in mind! They’re now easier to understand and use, making your workflow smoother. 🎉
But wait, there’s more! Now, you have the power to decide whether a form should be filled out only once when a client books their very first service or makes their first purchase from your business. And if that doesn’t suit your needs, no problem! You can still choose to require the form for each specific service or item, or even every time.
Let’s say you offer a 30 minute massage and a 45 minute massage. You can configure your form so that clients only need to fill it out once, regardless of its length, and they won’t need to fill it out again if they book a massage appointment.
You’re in complete control of when forms appear for your clients.
With these changes, managing forms is simpler and more customizable than ever before! 💡📃
Ready to explore? Access any form’s settings by heading to the App Drawer > Forms > Settings.
Check out Form settings to learn more!
Enhanced privacy settings for clients in forms
We’ve introduced some fantastic privacy settings in Forms! Now, you’re in charge of who can fill out the form: both clients and staff, or just the staff. 💥
You may wonder why this is such a game-changer. Let’s consider Maria, a dermatologist. She relies on a client consultation form she has designed to gather crucial information before each appointment. These forms are essential for her to tailor treatments effectively. With this recent enhancement, it is now easier than ever for Maria to specify that only staff can fill out the form, while clients can view the completed form on their profile. Alternatively, she can choose to restrict access to the form, ensuring it remains private and only accessible to staff, thus providing enhanced confidentiality for sensitive client information.
When your form is set to only staff can fill it out, all relevant client settings are disabled and there will be no Direct Form URL.
And let’s not forget about security! By specifying who has access to sensitive forms, you’re ensuring that sensitive information remains protected. 🔒
Learn more about this enhanced form security by checking out Form settings.
New Appointment, Review, and Lead Capture website widgets COMING SOON
We’ve been working hard behind the scenes to improve your clients’ experience with the widgets embedded on your website! With this release, we rebuilt our Appointment, Review, and Lead Capture Widgets using new technology to make them faster and mobile-friendly. 📱
The website widgets you’re already using will continue to work with this release, but we recommend changing over to the new code sooner rather than later. If you’re ready to make the switch, head over to App Drawer > Setup > Website Widgets, select the New widget code tab in the Embed Code section, and replace the existing widget code on your website with the new one.
If you’re using (or looking to start using) the Lead Capture widget, you can still customize it to match your business’ branding! 🌟
Looking for details on how to embed a widget onto your website? Check out our Knowledge Base for a step-by-step guide.
Display events on your clients’ class schedule
We made a helpful update to how your classes and events display to your clients on the Client Web App. You can now opt to show both classes and events on the Classes book now tab to streamline the process of checking out your services. ✅
To do this, select both the Class and Event book now tabs when you’re creating or modifying an event. Once you do that, the event(s) you’ve set this up for will appear alongside your classes on the Classes book now tab.
These changes, should you choose to apply them, will appear for your clients in the following places:
- Client Web App 🖥️
- Achieve White Label Client App 📱
- Standard Schedule Widget 📅
- Custom Schedule Widget 📆
Want to learn more? Head over to Event general information settings.
Consistent display of service information for external calendars
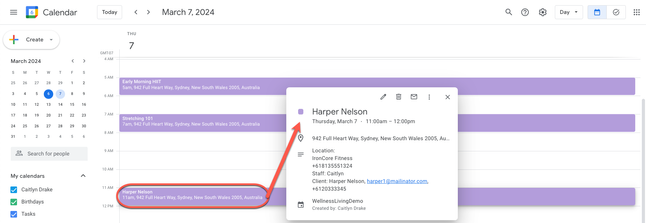
If you have your WellnessLiving staff account linked to your Google, Microsoft, or Apple calendar, you know that it can be frustrating when your appointments are displayed differently than the way you see them on the schedule in WellnessLiving. 📅
Now, when you have specific display settings enabled in Setup > Schedule Design > Look and Feel, you’ll see that selection carried over into your external calendar as well. These changes will only apply to new appointments that were synchronized to your calendar after this update was released.
Whether you prefer your schedule to show the appointment type, client name, or staff name, we’ve got you covered. Consistency is key! 🔑
Interested in reading more? Our Schedule Design settings article has all the details on appointment display settings.
Display service add-ons in appointment notifications
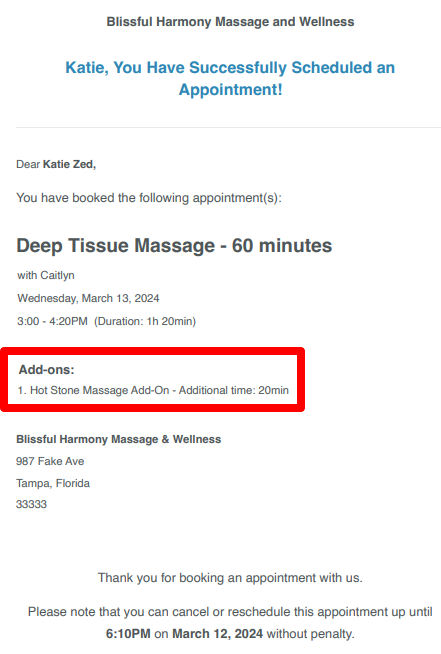
Don’t want to leave your clients in the dark about their appointment details? We hear you! That’s why we’ve made some changes to our appointment notifications, both confirmation and reminders, to provide more clarity.
Now, when clients book an appointment with add-ons or additional time, they will receive notifications that include all the important details. No more guessing games or confusion! 🕵️♂️✨
Whether they’re booking a 60-minute facial with a 15-minute exfoliation add-on or any other combination, their confirmation/reminder email, SMS, or in-app push notification will include all the necessary information. Just add the new variable, [Addon] to your appointment notification templates. 📅💡
Set up your appointment notifications by heading to the App Drawer > Setup > Notifications > Appointments.
Sort attendance lists by check-in status
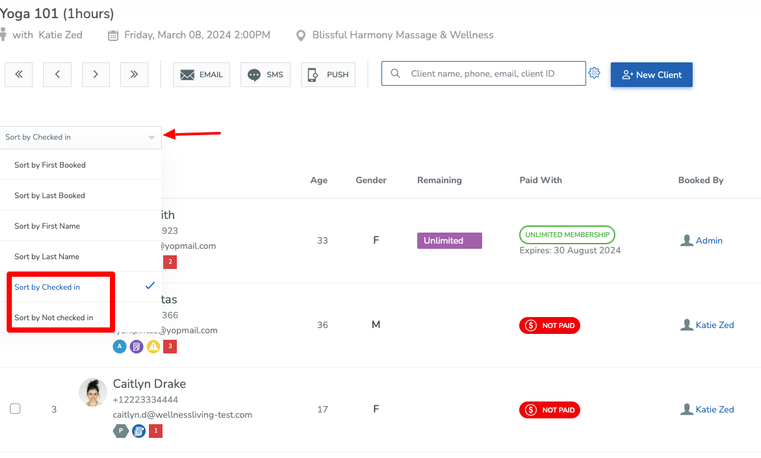
We’ve added two new sorting options to the attendance lists for classes & events, making it easier than ever to manage your sessions. 🎉
This is incredibly useful for Marla, a Nurse Practitioner, who leads master injector classes for other aesthetic providers. When she checks her class roster, she needs an effortless way to see who has checked in and who is absent. Well, now she can! 👩🏼⚕️💉
Check out the new sorting options:
- Sort by Checked in: Now you can see your clients listed in the following order: Attended, No Show, Late Cancel, Pending, Upcoming Bookings.
- Sort by Not checked in: With this option, clients are listed in the following order: Upcoming Bookings, Pending, Attended, No show, Late Cancel.
And here’s the best part: while this functionality was always available in the Elevate Staff App, it’s now also been added to the Staff Back Office. So whether you’re on the go or at your desk, managing your attendance list is a breeze. 🌟
Looking for a step by step process? Check out Viewing an attendance list.
Automatic asset assignments for partner bookings
For businesses using our ClassPass or Gympass integrations, this one’s for you! When your clients book a class that has assets through one of those partners, they’ll now be assigned a default available asset when they book their spot. 🚴
If there are no available assets for the session, the client will receive an error from ClassPass or Gympass when they try to book the session, letting them know there are no assets available. This will prevent the booking from being completed.
With the appropriate staff role permissions, your staff can change the assigned asset for clients, regardless of if the booking was from ClassPass, Gympass, or WellnessLiving.
New and improved Welcome email notification
We’ve revamped the welcome email notification template to ensure that all new clients receive the essential information to kickstart their experience at your MediSpa.
To populate the new template, remember to click on Fill with default template below the editor. Don’t forget, you can edit the default template to tailor the Welcome email to your specific needs.
We’ve also introduced three new variables that you can use in all notifications, including the Welcome email:
- [AppButtons]: This nifty variable fills in the download link buttons for your Achieve Client App, whether you’re using the Basic or the White Label app and will send clients right to the App Store or Google Play.
- [ClientWebAppURL]: This handy variable automatically populates your link for URL for the Client Web App.
- [ButtonClientWebApp]: This variable populates your link for the Client Web App into a neat button.
Note: To have your Achieve App download URLs set up, please contact WellnessLiving Support. Once they are set up you can view them by accessing the App Drawer > View All > Achieve.
Check out the new Welcome email notification template by heading to the App Drawer > Setup > Notifications > Client Notifications > Registration > Welcome. 💫
Updated service age restriction behavior
We made a couple adjustments to how age-restricted services work in the system:
- Age restriction for services now takes the service start date into account. This means that when you or your clients are booking these services, we will now calculate the age that the client will be when their service takes place, instead of the age they currently are at the time they make the booking.
- For example, if you have a service with a minimum age of 18 and a 17 year old client wants to attend it, they’ll be able to book in as long as they’ll be 18 by the time the service takes place.
- When clients are booking an age-restricted service on the Client Web App AND they’re adding a new relationship that they want to book for, the system will now ask them for a date of birth for that relationship (which is a required field). Even if the relationship doesn’t meet the age requirements, it can still be added, but the person booking will get an error that they can’t book the service due to the age restrictions.
- For example, Sarah wants to book her teenage daughter for a skincare session. Sarah adds her daughter as a new client and, since age is required for the service, she must specify her daughter’s date of birth.
To learn more about both of these updates, head over to Setting an age restriction for a service.
Customize the maximum number of days past due for Collections ADD-ON
When a business is subscribed to Collections, clients were previously automatically sent to Aldous for follow up (excluding when a staff member marks them as exempt) 90 days after their balance became past due. With this release, you can now request that our Billing team change the default number of days past due to a different number of days when you’re signing up for Collections! 💳
Interested in signing up for Collections? Get all the details here!
More control for staff to stop recurring class bookings
When your clients are booked for recurring appointments at your MediSpa, it is now simpler for them to cancel their upcoming sessions in one streamlined process.
Staff can now cancel a client’s last booking for a reoccurring appointment series, eliminating all future sessions. Additionally, staff can also select Cancel All from the client’s session history or upcoming schedule to perform this action.
Looking for more details? Check out Canceling a class booking.
New location for attendance status for appointments and assets
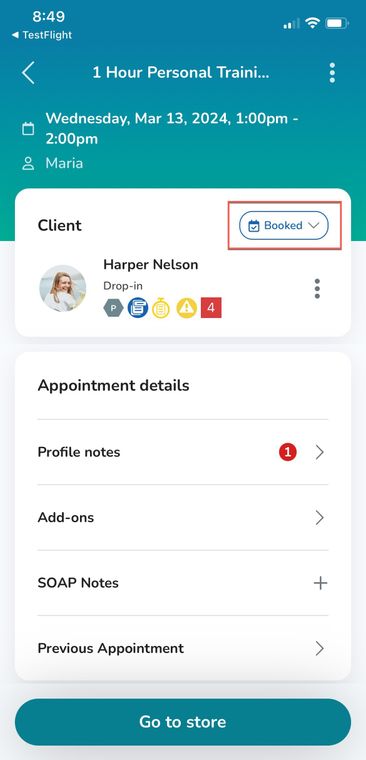
When you’re changing the attendance status for a client’s appointment or asset booking on the Elevate Staff App, you’ll see a new menu near the top of the Client box. From this new menu, you’ll be able to mark clients as Confirmed, Pending, Checked-in, Early Cancel, Late Cancel, or No-show.
While the attendance status options have been removed from the 3-dot action menu, you can still reassign assets, sell new Purchase Options, send SMS messages, and add QUICK notes from there.
Minor Improvements
Achieve Client App
- New look for Forms on Achieve: We redesigned Forms on the Achieve Client App! Now your clients will enjoy an easier view of their complete and incomplete forms (separated into different sections), along with a handy green or red dot beside each one to show completion status.
Automated Marketing
- View marketing campaigns: Check out your marketing campaigns in a snap! Just head to the Marketing Campaign Report > Action column > three-dot action menu > View to see your campaign. If it’s already been sent, you can easily view it. If it’s scheduled, you can view and edit it!

- Visual editor loading: When you save a template using the visual editor, sometimes it takes a moment for the system to generate the preview. You might see a message saying “Preview of email” which often looks like an error. To improve this, we’re adding a loading state while the preview is being generated. This change will apply to all areas with access to the visual editor.
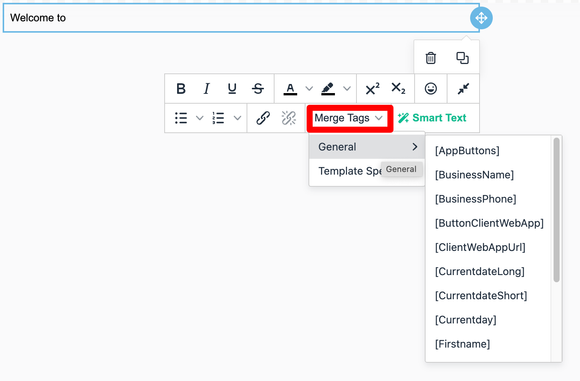
- Add merge tags to visual editor: We’ve added merge tags, same as our email variables, to the visual editor in notification and automated marketing templates. This adds to the ease of creating custom templates for clients!
- Manage campaigns more efficiently: We’ve improved the Marketing Campaign Report so that you can have more information about your campaigns. You will have a better idea of the status of your campaign, which client groups or types it is going to, and more!
Book-a-Spot Assets
- Maintain asset booking: Previously, when a staff member changed the schedule of an existing service with an assigned asset, the original asset didn’t stay with the client. But, guess what? We’re making things better! With this improvement, clients who have reserved assets won’t lose them when schedule changes are made.
- Keep asset names consistent: Asset names will now be consistent across all areas of the software.
- Booking assets now directs to schedule: When you head to a client’s profile and select Book > Asset, you’ll now be directed to the schedule so that you can review the asset availability for your business. 📅 Previously, you would be taken to the Add Another Asset page, which didn’t provide visibility into the schedule for the rest of the assets. With this improvement, you’ll be able to check the calendar or list view of the schedule, select an asset, date, and time that works for the client, and complete your booking!
Classes & Events
- Schedule changes no longer affect recurring, ongoing class bookings: We fixed an issue where making changes to a class schedule, such as substituting an instructor for a single day, would affect clients who were booked into the class on an indefinite recurring basis.
Clients
- ACH payment method for Paragon saves without errors: We squashed a bug for Paragon users! Now when you’re saving an ACH payment method with Business as the account holder type and Savings as the account type, you won’t run into any incorrect account type error messages.
Client Profile
- Add relationships to Overview page: Now, on the Overview page of a client’s profile, you’ll find a list of their relationships. Just click any name and you’ll be taken directly to that client’s profile.
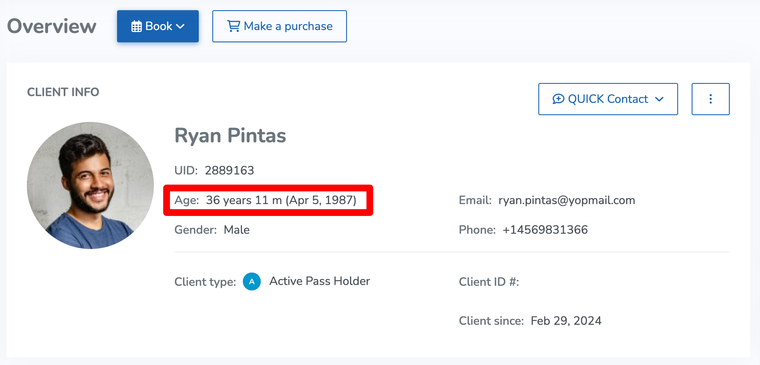
- Add client’s date of birth to Overview page: The client’s date of birth will be added to the Overview page of the client profile.
- Improved Transaction Report on client profile: If a client at a business with more than one location has a negative balance, their profile’s transaction report will now show their home location when they’re automatically charged.
Elevate Staff App
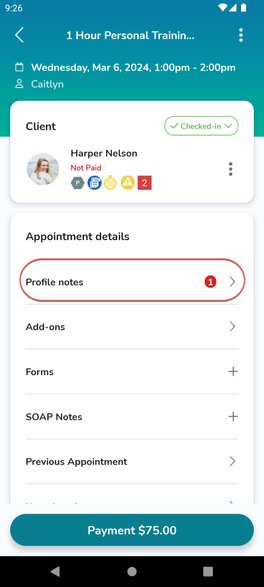
- Updated design of profile notes from Appointment Details page: We tweaked the design of a client’s profile notes when you’re accessing them from the Appointment Details page on Elevate. The previous Alerts section has been renamed Profile Notes, where you can still view, create, edit, and delete important notes that are attached to a client’s profile.
- Staff can book appointments for clients who don’t meet age requirements: When using the Elevate Staff App, staff members can now override age restrictions for appointments. This improvement will allow staff to see appointments where there’s an age restriction that the client doesn’t meet and book the client in if they feel it’s appropriate. For example, if your client is 17 and the appointment they want to book has a minimum required age of 18, you can now opt to book the client in regardless.
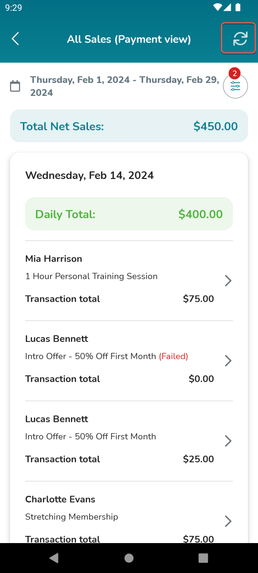
- New location for refresh button on the All Sales Report: We moved the refresh button on the All Sales Report on Elevate to the header (top section) of the report.
- Client name visible on Elevate alerts: Your client’s name will now appear first on new message alerts in the Elevate Staff App. This small tweak makes it super easy to see who is messaging you without having to open the app first!
FitLIVE
- Allow clients to join virtual appointments without signing in: We added a new toggle to FitLIVE Settings > Security called Enable joining without signing in that is OFF by default. When this is toggled ON, your clients will be able to join your virtual appointments without signing in to their accounts, provided they click the Join link or button from their service reminder or confirmation notifications.
Forms
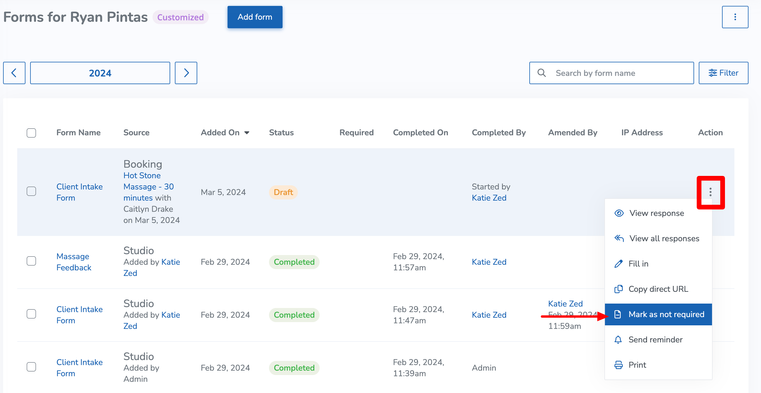
- New filter for “not required” forms: We’re making it easier to manage forms on client profiles. Now, you can mark forms as not required without any confusion. We’re adding new filters and columns to keep things clear and organized. Check this out by accessing a client’s profile > Documents > Forms.
- Automatically scroll to the top of the form with an error message: We’ve enhanced our form experience. If staff or clients miss any required questions, the form will automatically scroll to the top, making it easy to spot the error message. Say goodbye to confusion and hello to smoother navigation!
Integrations
- Updated behavior for services booked through Gympass: Staff can no longer change attendance status or cancel bookings for services booked through Gympass, except when a client no-shows. Client’s attendance status is now managed entirely through Gympass and their app.
Message Center
- SMS limit warning: For Message Center subscribers, we’re adding a helpful feature: a pop-up warning when your QUICK Contact SMS messages are nearing your monthly limit. Stay informed and avoid any surprise charges.
Notifications
- New variables on Class Announcement notification template: We’ve added two new variables to the Class Announcement notification template: [PublishDate] and [UnpublishDate]. A great way to better communicate with your students!
- Reminder notifications for Book-a-Spot assets: We’ve expanded our notification system. Now, your clients will receive reminder notifications for Book-a-Spot assets. The Appointment Reminder notification will now also cover asset reminders, ensuring they never miss a service!
- Manual push notifications send correctly: We fixed a bug where manual push notifications were failing to send to clients that had their News and Updates email notifications turned off.
- Clients can answer NO to decline wait list spots: With this improvement, clients will now be able to respond NO to Appointment/Class/Event Wait List Promotion (Client Confirmation Required) SMS notifications. If you require clients to manually confirm that they want to be promoted from the wait list when a spot opens up, responding NO to this notification will remove the client from the wait list for that service and the next client on the wait list will be notified.
Note: You’ll need to have a Message Center subscription for clients to be able to respond to your SMS messages. - Do Not Disturb no longer affects clients confirming wait list spots: When your clients receive an email to confirm they want to be promoted from the wait list for an appointment, class, or event, the timer for them to respond with their confirmation will now start from when the email is actually sent. Previously, the timer would begin when the email was generated by the system, even if the message was delayed by a Do Not Disturb period for client notifications.
Purchase Options
- Update pop-up when changing an already signed contract: When a signed contract for a Purchase Option or service gets updated, you and your staff will now encounter a sleek redesigned pop-up that allows you to choose whether clients need to re-sign it or not.
- Edit log to capture updated Purchase Option pricing: The edit log has been fine-tuned to ensure it accurately reflects all changes made to Purchase Option pricing.
- New location variable available for contracts: Our Enterprise Contract managers and multi-location business owners are eager for a [LocationAddress] variable in contracts, similar to email notifications. This upgrade will make creating location-specific contracts a breeze, perfect for multi-location businesses.
Reports
- Updated reporting for payment plans: We changed the name of installment plans across the software to Payment Plan, along with adding the schedule for clients’ payment plans to their receipts. Additionally, payment plans and deposits will now appear under these accounting methods:
- Cash accounting: Displays the amount of the payment plan/deposit on the date the client paid.
- Accrual accounting: Displays the full price of the item/service.
- Accrual & Cash: Displays the amount of the payment plan/deposit on the date the client paid.
- Account credit and debit clarification: We cleaned up the All Sales Report and your client’s Transactions page. We added clarity around account credit and debit reporting, so you’ll easily be able to see these line items in a more streamlined way.
- More reliable Appointment Reports: We rebuilt the Appointment Details and Appointment Summary Reports, making sure they display all appointments in the selected date range – even if you have a large number of records. Gone are the days of missing records!
- $0 memberships show in Projected Revenue Report: In the past, $0 memberships with scheduled payments did not show up on the Projected Revenue Report. This report now displays $0 memberships with scheduled auto-renewals AND scheduled payments, so you’ll easily be able to see both upcoming $0 payment options.
- Active memberships no longer appear as expired: The Memberships Report now includes memberships that are expired but set to auto-renew as Active.
- Added clarity on Projected Revenue Report: We made some adjustments to the Projected Revenue Report to add some additional clarity. Now, when a client has a Purchase Option with upcoming scheduled payments that will be billed to their account balance, you’ll see Account listed as the payment method.
- New summary cards on Booking Source Report: We added summary cards to the Booking Source Report! Now you’ll be able to review the booking sources and number of bookings from each source (WellnessLiving Explorer, Staff Back Office, etc.) at a glance. Tip: The cards won’t generate if there are no bookings for a source in the date range you select on the report.
- Horizontal scrolling available in reports: Trackpad and Magic Mouse users rejoice! You can now scroll horizontally inside tables and reports by swiping to the left and right anywhere in the table!
Rewards
- Free service rewards prizes now appear as discounted drop-ins: Clients who redeem a free service prize and use it to pay for a service will have the prize appear on their Passes & Memberships page as a 100% discounted drop-in. In cases where the client early cancels and the drop-in is able to be reused for another booking, staff will be able to apply it to another applicable service.
Schedule
- Apply Filter button is stickied to the bottom of the schedule: Previously, you had to scroll all the way to the bottom of the filter panel to be able to apply your schedule filter. You’ll now see it stickied to the bottom of the menu, no matter how far up or down you scroll.
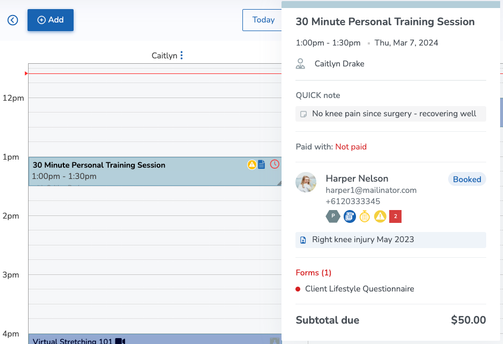
- Updated display of notes on appointment hover card: Great news! When you hover over an appointment on the schedule, you’ll see profile notes, QUICK notes, and forms with more separation, making it easier than ever to review your client’s details.
- Restore session option in calendar view: We’ve noticed that while viewing canceled class or event sessions, some actions are missing in calendar view, causing inconvenience. Our solution includes the three-dot action menu for canceled sessions to allow you to restore the session, update the substitute instructor icon, and add a badge to indicate when a session is canceled.
Task Manager
- Tasks sorted by due date: The task manager now sorts tasks by due date, making it easier for your staff to prioritize their work. Tasks due soonest will appear at the top of the list, ensuring everyone stays on track and focused.
Web Apps
- Clients can see assets on the Self Check-in Web App: Now when clients are checking in for their service bookings using the Self Check-in Web App, they’ll be able to see the asset that’s associated with their booking during the check in process.


